SVG Animation
SVG stands for Scalable Vector Graphics. Which means you can scale the graphic and it will never ever pixelate. This post I am going to be diving into animating these SVGs!
Animating SVGs is SUPER EXCITING! There are so many attibutes you can animate and you can even style the animation with CSS! Its like animating with a shape layer in After Effects. Its like having a GIF that you can scale, style and tweak! Its basically a GIF on steroids.
Exporting SVG
There are many applications that export SVG (like InkScape, Fireworks< and Webcode), but the most popular are Illustrator & Sketch. When exporting from these applications I noticed some of differences. Overall, Illustrator exports messy SVG code and Sketch exported clean code with some extra perks. For example: Sketch exports the path name to a id="path-name" in the SVG file, and does the same for groups on the <g> tag. This is saves a ton of time so that when you write your animations you have the id selector there ready for you to control. So overall when exporting SVG file - I recommend Sketch. *(sidenotee: Illustrator does the same thing, though, so I would be careful with this remark, be more specific)
If you want to know more about SVG Exporting, Alex Walker did a post about this on Sitepoint.
Styling Properties
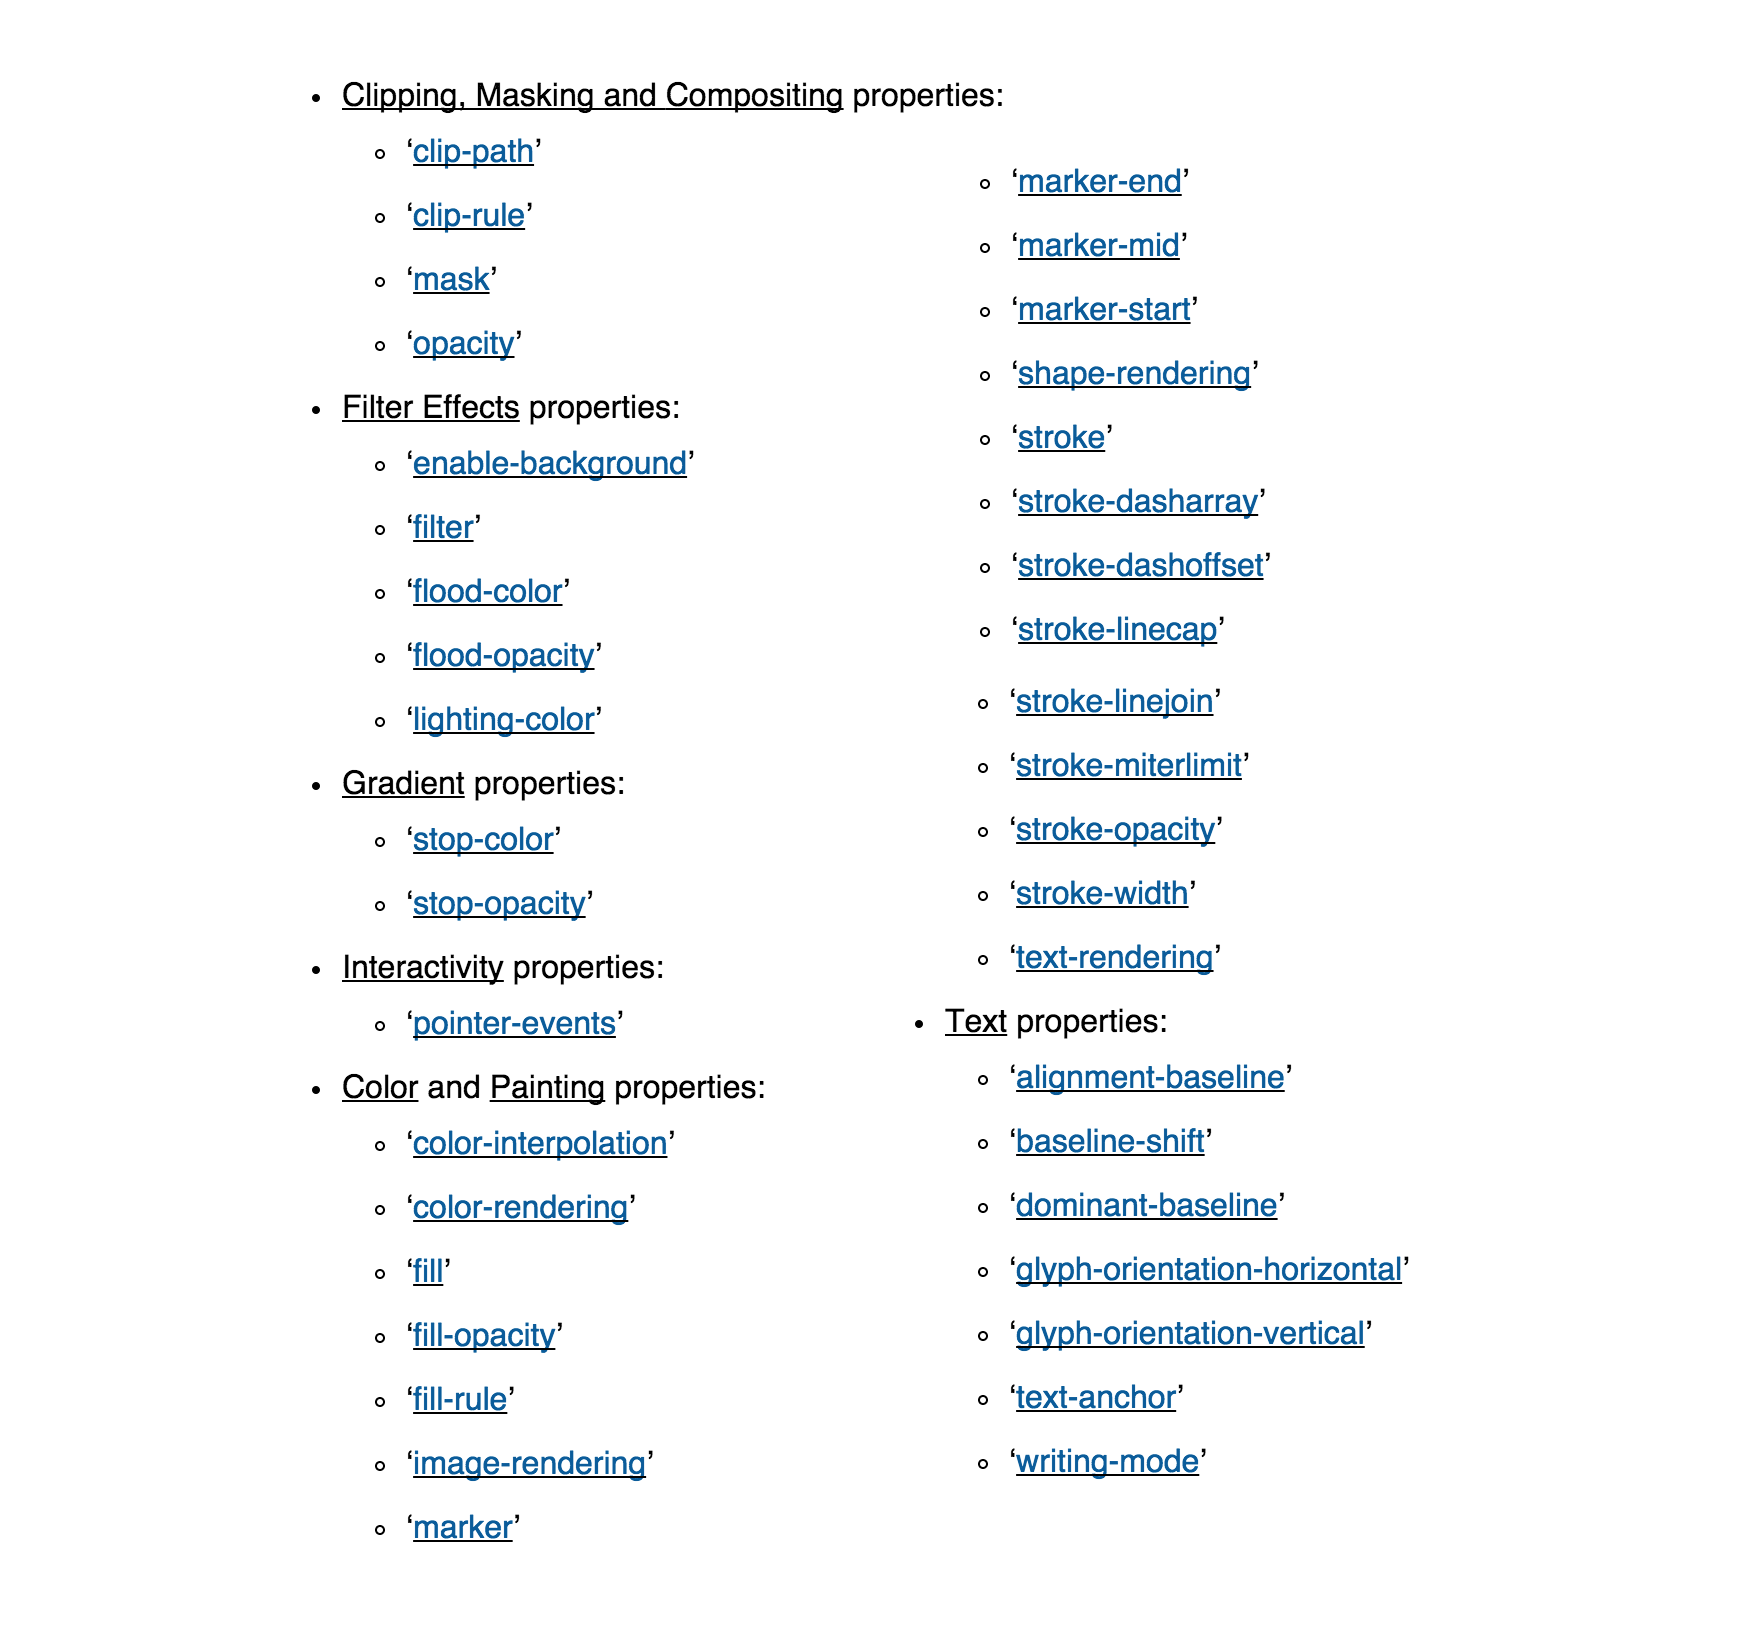
There are so many properties you can use when animating SVGs its AMAZING! You can look at the SVG Styling Properties Documentation to see all the attributes. Some of these styling you might be familiar with from CSS. Below I have pulled out the styling properties that are unique to SVGs.
SVG Animation Syntax
What is SMIL
Now for the nerdy stuff: what is SMIL and how does it relate to SVG? SMIL Stands for Synchronized Multimedia Integration Language, and it is the animation language to which SVG is a host. SVG’s animations have the contstraints and features that are permitted by the SMIL Animation Spec but thats not all! In addition to SMIL contstraints SVG’s have additional capabilities defined by W3 SVG Animation Spec, such as animateTransform, path, & keyPoints.
SVG animations are simular to CSS animations because they have keyframes, easing curves, etc. but, it’s presented in a different syntax. One of the downsides of SMIL is that it doesn’t work with any version of IE and Opera Mini. CanIUse
The animate Element
The <animate/> element is used to animate a single attribute or property over time.
The basic structure:
<animate
xlink:href="#your-item"
attributeName="cx"
from="20"
to="450"
dur="1s"
fill="freeze"
/>
xlink:href- selects the element you want to animate. Ifxlink:hrefis not defined the animation will default to its parent element.attributeName- defines the attribute of the element selected.from->to- defines the values of the attribute you are animating. Think of them as the same asfromtoin CSS.dur- duration of animation, similar to theanimation-durationin CSS.fill- same concept asanimation-fill-modeproperty in CSS. It defines what to do with the element after the animation is finished.
Now lets look how this looks like when translated to CSS. I added color highlights so you can see where the attributes go when translated from SVG to CSS.

Getting fancy with Keyframes:
<animate
xlink:href="#your-item"
attributeName="cx"
from="20"
to="450"
dur="1s"
fill="freeze"

values="20; 10; 30; 40; 450"
keyTimes="0; .25; .5; .75; 1"

/>
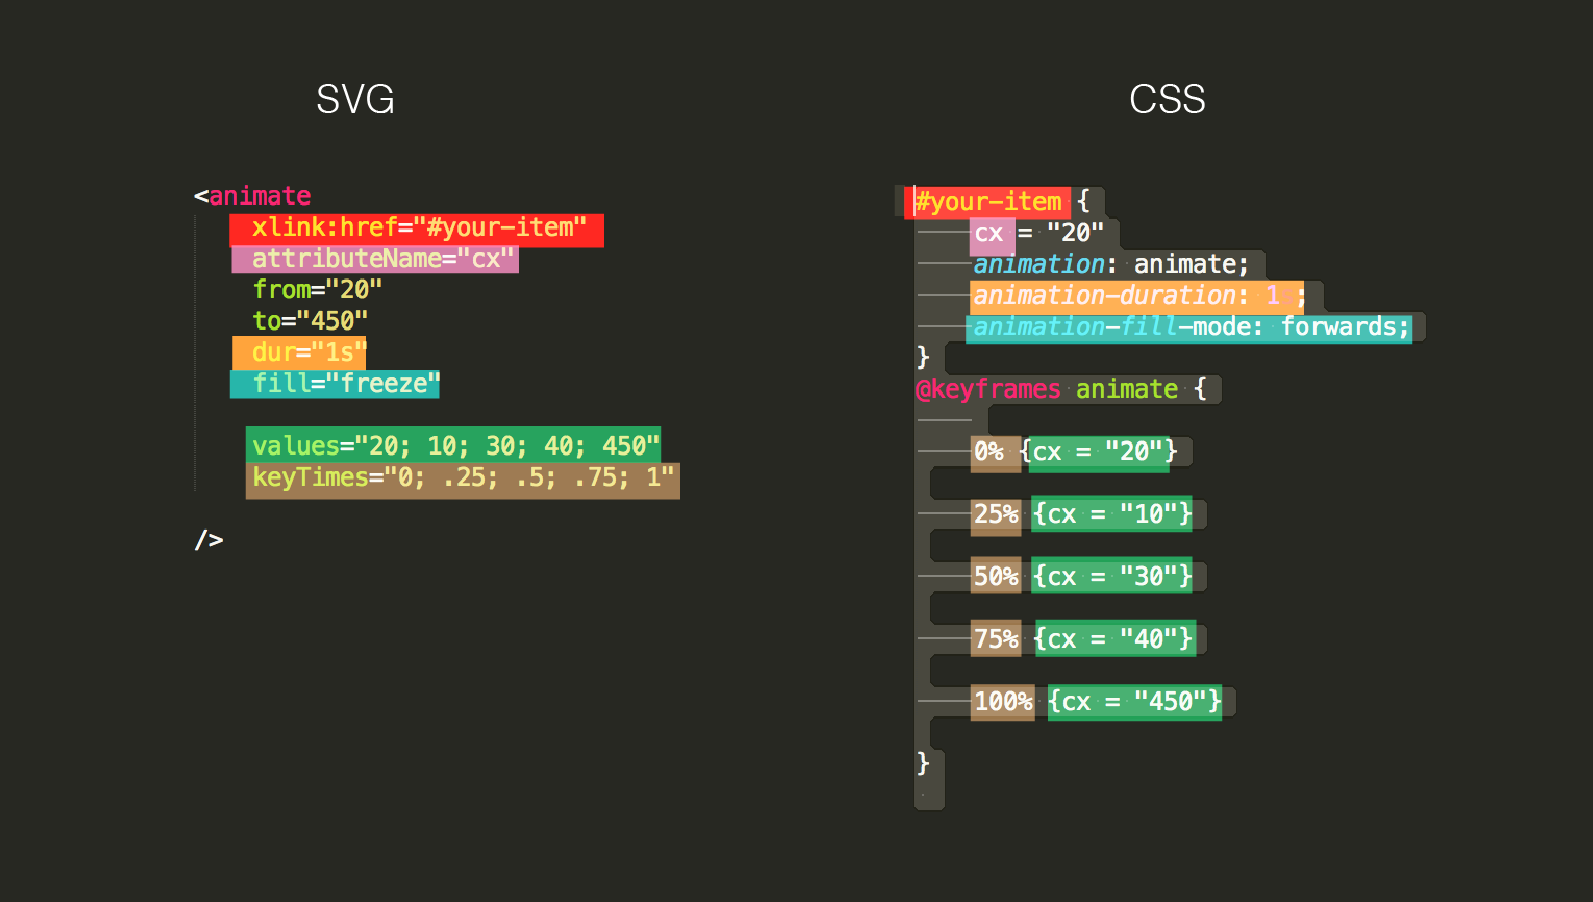
values- Above we definedfromandto, with thevalueswe are defining how that changes over time in more detail just like keyframes.keyTimes- keyTimes is defining the % of the animation. The order ofkeyTimescorrolates directly to the order ofvalues. ThekeyTimeslist has to start with0and100
Now lets look how this looks like when translated to CSS. I added color highlights so you can see where the attributes go when translated from SVG to CSS.
Getting EVEN fancier with Easing Curves:
So how to you make the BEAUTIFUL easing curves with SVG animation? I will show you how!
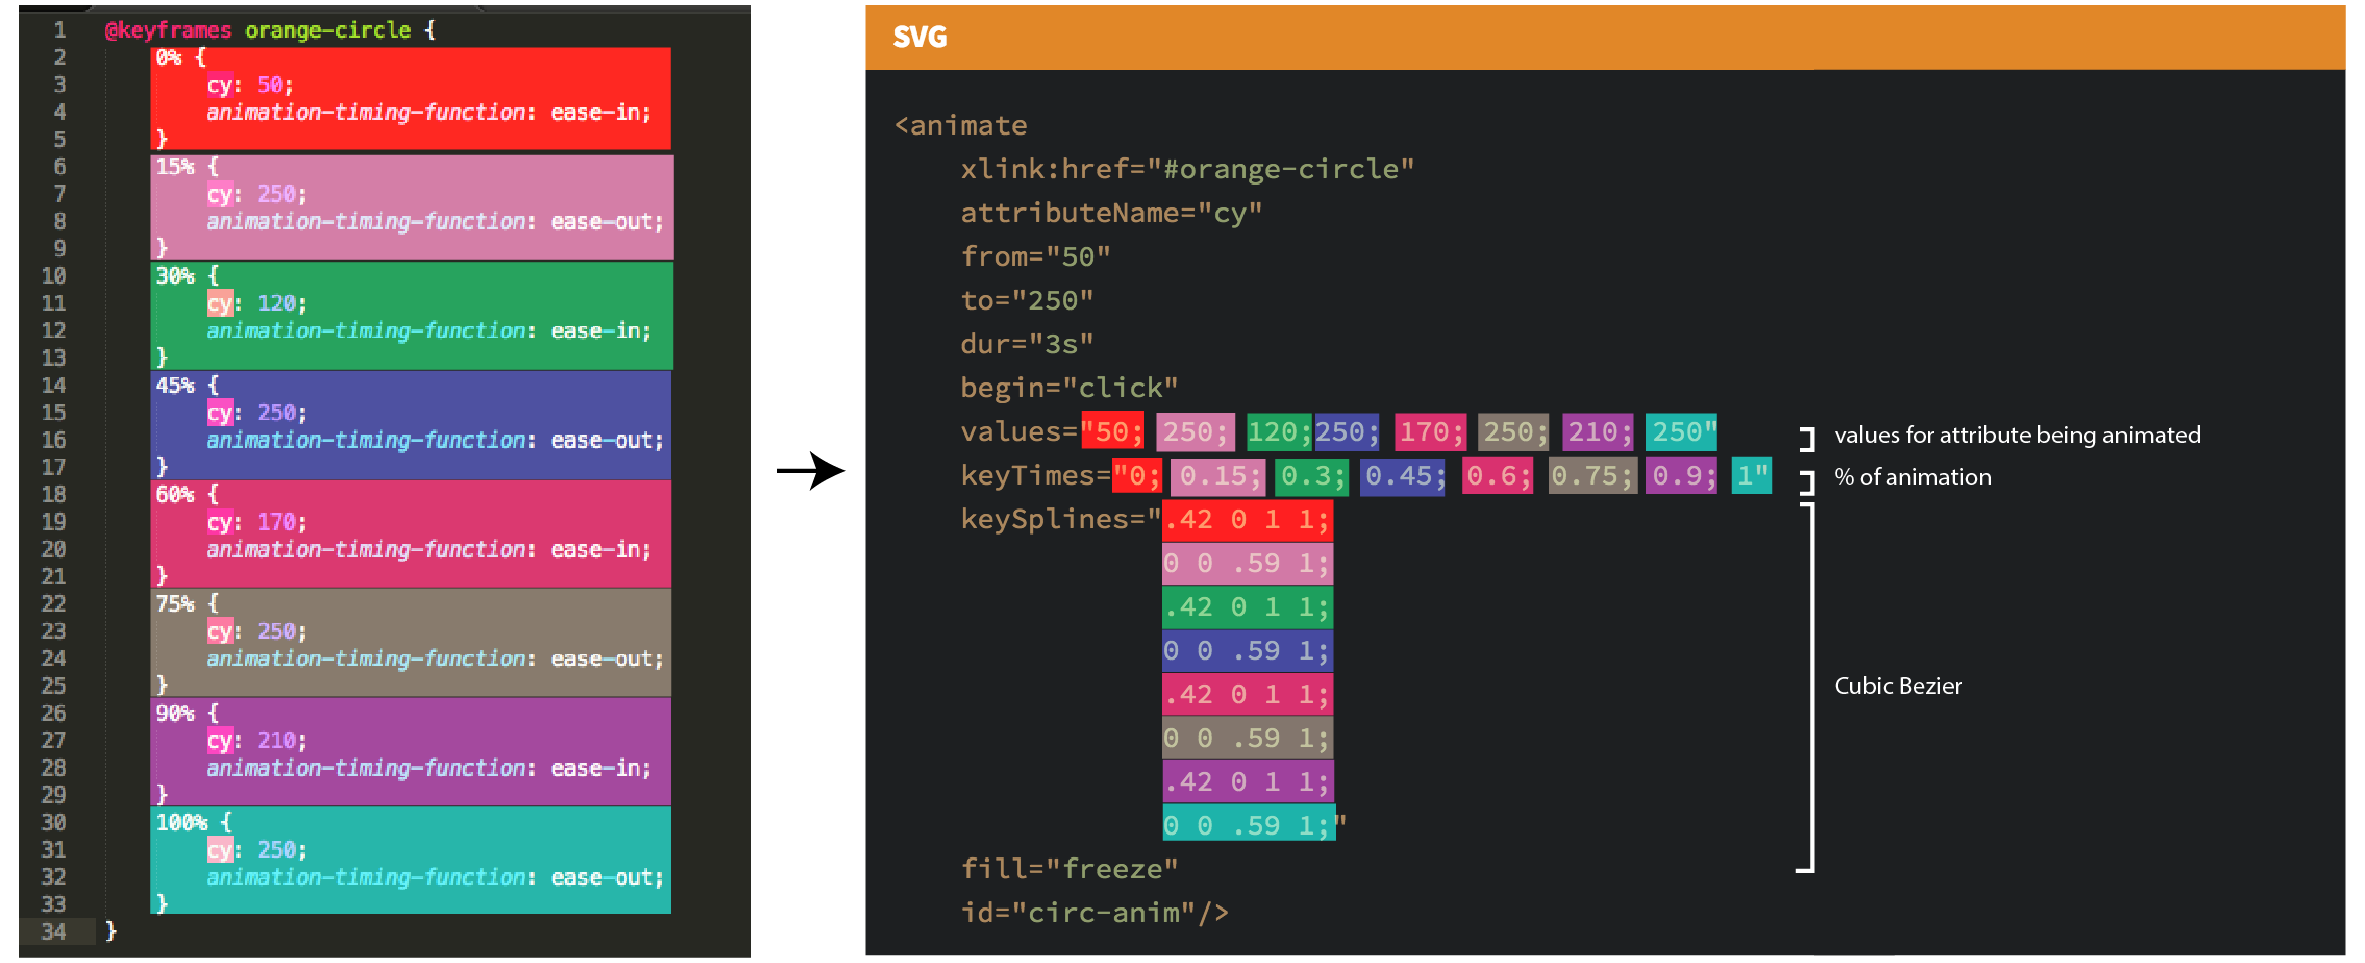
Above you see the CSS @keyframe animation structure on the left and on the right the SVG animation structure. I added color highlights so you can see how the attributes go when translated from CSS to SVG.
Note there is no CSS property called cy. I have it there as a place holder to gain a better understanding of SVG animation structure.
CSS to SMIL:
cyproperty =attributeName="cy"cyvalue =values@keyframesanimation % =keyTimesanimation-tmining-function=keySplines
Things that don’t translate from CSS to SVG animation are pre-defined cubic-bezier’s. For example: ease-in in CSS = cubic-bezier(0.47, 0, 0.745, 0.715) in SVG. There is a great tool by Lea Verou that does these calculations for you. To understand more about CSS animation check out my other post Ae to CSS.
How I Animate
- Define Shape/Path for Animation
- Define Property to Animate
- List out Property Values
- Define Percentage over time for those values.
- Map out the easing curves between keyframes.
Other Cool Things:
- Animate along path with
<animateMotion> - Interactivity (kinda) Starting animation with Click
begin="click"
Resources:
- World Wide Web Consortium SVG section
Thanks to Sara Soueidan and her wealth of knowledge of SVG’s and for helping me with this learning curve!
Thanks to Una Kravets for helping review this post!